Over the years of receiving and providing instruction on this I’ve developed what I’ve found to be the best method (so far) of how to handle this emergency and all the DPEs I’ve sent my students on to test with seem to agree. The acronym A-B-C-D-E covers everything.
When the dreaded phrase “Your engine just failed” is uttered by an instructor or DPE performing the A-B-C-D-E steps below will cover everything important and should be easy to remember. This procedure has been developed from instruction I’ve received, refinements I’ve learned from practice over the years, from other instructors examples or real-world situations. I will happily steal the best ideas and incorporate them into my teaching.
‘A’ – Airspeed
Simple enough – Establish your airspeed for ‘best glide‘ in the airplane you are flying. You should already have this memorized or use a quick-reference card with data taken from the POH like the one I use below for one of the airplanes I fly from time to time.

‘B’ – Best Place To Land
Your new runway. I recommend to my students that when they establish best glide that also begin a slight bank to the left – no more than standard rate – so they can look around and below to find a suitable place to land. Usually pilots will get tunnel vision and just look straight ahead to declare their new runway, while the best place to land might be below or just behind them.
Ideally everyone should be periodically looking around during climbs and cruise for potential landing sites, but the reality is that this doesn’t always happen especially when busy and nervous during checkrides.
Once that new runway is identified try and identify where the winds are coming from so you can land into the wind, just like you would at an airport (ideally). Then work to spiral down at best glide near where you would expect the downwind-to-base corner of the pattern might be so when you’ve completed the remaining steps and you are low enough you should be in a good position to land with most of that new ‘runway’ available to you.
‘C’ – Checklist
This is the point when you run through the engine checklist items to ensure all the ‘fuel and spark’ items have been checked to ensure something simple is not preventing the engine from running normally (e.g. mags on ‘both’ or switching from a dry to a full tank of fuel, etc.).
Normally this is performed via a ‘flow’ and the paper checklist is brought out if there is time or read aloud by the passenger (or DPE) to ensure no items were missed. However, there may not be time to spend on a paper checklist if it took too long to get to this point and/or the altitude is too low. Remember that altitude = time and time = options. The sooner these steps are accomplished and the less altitude lost will allow for less panic and more preparedness to be accomplished.
Using the flow of ‘up and over’ or ‘over and down’ on most training airplanes will cover everything on the POH’s checklist.
‘D’ – Declare
At this point it is clear that the engine is not restarting, the airplane has betrayed us and the insurance company now owns it, so our goal is to land safely and return home with a thrilling tale to tell everyone at Thanksgiving.
Time to declare an emergency and take the ‘search‘ out of the phrase ‘search and rescue‘. This may vary from what others teach, but I’ll explain why I’ve found this is the best procedure so far.
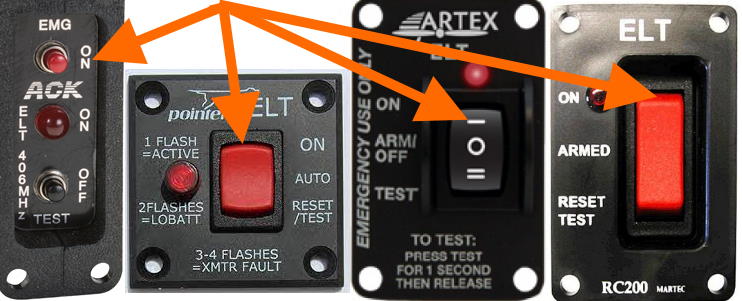
First; push that ELT activate button on your instrument panel. Let it start talking on the Guard frequency (121.5MHz) for you. In addition to the siren it wails on 121.5MHz, most ELTs also broadcast on 406MHz with a GPS location, so don’t waste your time trying to talk on Guard, let the ELT do it for you because it will do a better job AND it will broadcast continuously while you are busy with other things such as landing the airplane. Another reason is that ELTs don’t always activate on impact or may be damaged on impact, so I steadfastly maintain that it is better to have it transmitting early and often, long before the airplane hits the ground.
Another reason not to talk on 121.5 is because it isn’t well monitored. Take the real-world experience of Captain Barry Schiff, who experimented (with the FAA’s permission) by making short transmissions on 121.5 over various locations. Most of the time no one ever replied (even over Los Angeles).
Next, punch in 7-7-0-0 in your transponder, so that when ATC does hear that siren on 121.5MHz they also see the emergency code on their radar letting them know this is likely not an accidental ELT activation (which is common).
Lastly, talk to a human and say the magic words, ‘mayday-mayday-mayday’. If you are on a CTAF frequency there may or may not be someone listening and if there is they’re probably not going to be much help. Therefore, I recommend getting on the TRACON or ARTCC frequency covering that region and bust in with a mayday call. Since there is always someone on duty, make their day “interesting” and it will also help ATC connect the dots from the ELT wail on 121.5Mhz, the 406MHz GPS position report and the 7700 code appearing on their radar. Get a quick ‘mayday’ call out with the best position report you can manage under the circumstances and then move on to the last and most important step.
I don’t recommend attempting to keep conversing with anyone (ATC, other pilots, etc.) on the radio unless you have the time. The goal, again, is to take the ‘search’ out of ‘search and rescue’ and work to land safely.
Now, the one caveat to this is that there are some very old airplanes out there that don’t have a remote ELT activation button on the instrument panel and I fly a couple of these with students to this day. In those cases it will not activate until impact (maybe and hopefully), so switching to 121.5MHz and making a mayday call after putting 7700 in the transponder is the only best option. With enough altitude it may/should be heard by ATC or other pilots in the area to raise a level of alertness to your situation.
If you can manually active that ELT I also don’t recommend trying to talk on 121.5MHz since you can’t talk over it. In addition, as I mentioned above, there are frequent false activations or people accidentally broadcasting on 121.5MHz, so they are either not heard, ignored or frequently mocked by others (“meow”) listing in on Guard. Please watch this informative video from AVWeb below:
‘E’ – Execute The Landing
You’ve done everything you can at this point and now it’s time to land the airplane and ensure you and your passenger(s) walk away from it.
You should start by securing the engine; shutting off the fuel supply and throttle/mixture controls and grounding the mags by switching them to ‘OFF’. Always refer to the POH for the specific procedure, but, again, the ‘flow’ will likely cover everything on the list – then back up your flow with the checklist if there is time. You want to ensure you’ve done everything you can to keep fuel and spark away from the hot engine.
Next prepare the cockpit and passengers for the landing; passengers with coats balled up in front for padding (if available), passenger seat slid back from the dash, seat belts/shoulder harnesses tight, and doors ajar.
One side note on the ‘doors ajar’ step is that there are some training videos that suggest putting something (like a coat) in the door opening to keep it from closing again. However, this may not be such a good idea, so it is not something I recommend. Consider this event from SoCal Flying Monkey when they had their door ajar during flight:
I’ve experimented with opening a door in flight and found that not only it is hard to open (for obvious reasons), but it is also difficult to close. The wind acts with pressure on the outside of the door and with suction in the opening of the door jamb to make both actions difficult.
Another suggestion I’ve heard often is to open the doors and rotate the handle down to prevent them from closing and latching again. This is a suggestion that only works for certain model airplanes with specific types of door latching mechanisms and is not universal advice. Experiment with your airplane on the ground to see if this would work for the type of airplane you are flying that day.
With the engine, cockpit and passengers secure it is time to perform the best soft-field landing you’ve ever made. Extend flaps as needed and, in the last few hundred feet just before landing, turn off that Master electrical switch.
Once the airplane has come to a stop, do what you briefed your passengers to do before the flight (S-A-F-E-T-Y) on how to exit the airplane and where to meet, then assess the situation. Use your emergency kit and radio as needed to assist in your survival and rescue.
Many people are extremely optimistic on how soon they will be rescued and return to their comfy couches, but the reality is not as rosy of a picture. Remember the “Rule Of Threes” when it comes to survival:
- You can survive three minutes without breathable air (unconsciousness) generally with protection, or in icy water.
- You can survive three hours in a harsh environment (extreme heat or cold).
- You can survive three days without drinkable water.
- You can survive three weeks without food.
Unless the landing was on a freeway (not usually the best option) it will be some time before emergency services can mobilize with either helicopters or off-road capable vehicles and make it to your location. And the further off the beaten path the landing was will only make it more difficult to ultimately locate and reach your position.
One last note regarding the landings is that it is important to try and prevent any injury upon landing. Even something as relatively minor as a broken arm or clavicle can severely limit mobility at a time when mobility is paramount. Also the very real likelihood of shock, compartment syndrome or internal bleeding will shorten the time before professional medical services are required to prevent death. So, don’t neglect basic first aid skills, survival training and flying with a “go bag” or some form of survival kit.
Refer to this publication from the FAA and CAMI (Civil Aerospace Medical Institute) with lots of great information and instruction regarding aviation survival skills.